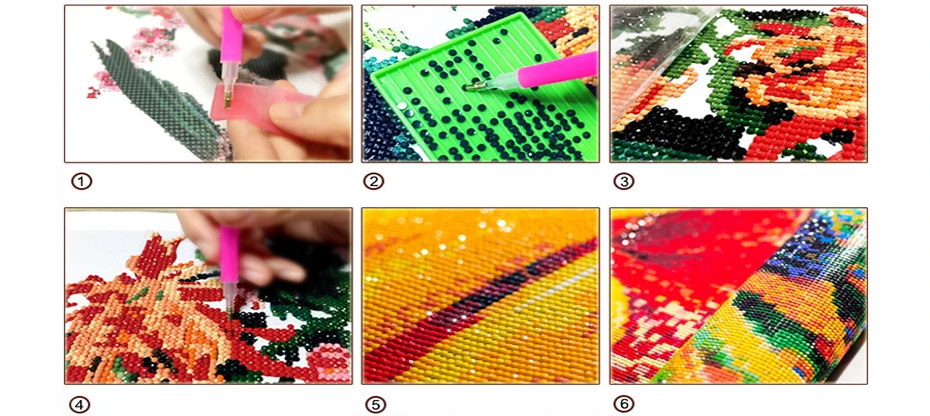
Diamond painting is an easy and enjoyable activity for people of all ages.
Based on the same concept as mosaics and paint-by-numbers, diamond painting uses tiny “diamond”-like facets to create colorful designs and patterns for finished designs that sparkle.
All you have to do is repeat below 6 easy steps one color at a time, and you will get your own Diamond painting ready soon!
== The larger the canvas, the more the details, the more time and effort involved ==

1. Refer to the comparison table on the canvas to identify each diamond number and the corresponding printed number on the canvas.
2. Insert the round end of the dotting pen into the dotting cement (push hard to keep the cement in place).
3. Use the round end of the pen to stick a diamond and slightly press down to remove any extra cement.
4. Tear apart the partial film and place the diamond on the canvas according to the corresponding number.
5. If you stick a diamond to a wrong area on the painting, remove the diamond with tweezers.
6. After finishing, slightly press down the diamonds with your hand or a book to ensure that the diamonds are firmly attached.
Use: Paintings
Material: Resin
Pattern Type: Scenic
Diamond Shape: Round
Form: Three-dimensional
Pasting Area: Full
External Packaging: Paper Bag
Canvas Packing Method: Rolled Up
Frame: No
Number of Colors: 1-30
Tools Type: Tweezers, Pick-Up Tools Kind
Kits Embroidery Method: Full Embroidery Type


